
The Chunky Farmhouse Round Rug: Step-by-Step Beginner Crochet Tutorial
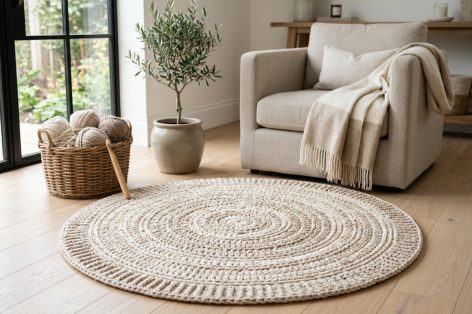
Few handmade decor pieces transform a room quite like a thick, textural round crochet rug. Whether placed beside your bed for a cozy morning step, nestled beneath a nursery rocking chair, or anchoring a sunny reading nook, a circular rug instantly softens sharp room angles and infuses organic farmhouse warmth into your living space.
Yet for many crocheters, making a round rug feels intimidating. We have all heard the frustrating horror stories: you spend hours crocheting with heavy yarn, only to watch your circle curl upward into a giant bowl — or worse, ripple uncontrollably into wavy potato-chip folds. Fortunately, keeping a crochet rug completely, gloriously flat is not a matter of luck; it is simple mathematical geometry!
In this comprehensive, beginner-friendly tutorial, I will guide you through the Chunky Farmhouse Round Rug from the very first magic loop to the tailored outer border. You will master the exact circle increase formula, learn how to prevent visible seams, and discover how to apply invisible non-slip backing so your handmade masterpiece is as safe as it is beautiful.
📌 Pattern Highlights & Project At-a-Glance
- Skill Level: Confident Beginner (Requires basic knowledge of magic ring, half double crochet, and slip stitches)
- Terminology: US Crochet Terms (Conforms strictly to Craft Yarn Council standards)
- Finished Diameter: Approximately 36 inches (91 cm) across — easily adjustable from 24″ to 48″+
- Stitch Style: Staggered Half Double Crochet in the Round (Prevents angular hexagonal ridges)
- Estimated Project Time: 3 to 4 relaxing afternoon crafting hours
- Durability: High-traffic grade, machine washable, and built to last for years
- The Golden Geometry: How to Crochet a Perfectly Flat Circle
- Choosing the Best Yarn & Cord for Rugs
- Materials & Tools Checklist
- Stitch Abbreviations (US Terminology)
- Step-by-Step Round-by-Round Tutorial
- Size Customization & Yardage Guide
- Crucial Safety Tip: Adding Invisible Non-Slip Backing
- Washing & Maintenance Instructions
- Frequently Asked Questions (FAQ)
The Golden Geometry: How to Crochet a Perfectly Flat Circle
Before touching your yarn, understanding why crochet circles curl or ripple will save you hours of unraveling. In crochet geometry, every stitch has a specific height and width ratio. For a circle to lie perfectly flat, the outer circumference must grow by a precise number of stitches on every single round:
🥣 Why Rugs Cup into a Bowl
If your rug edges begin lifting off the floor like a giant shallow bowl, your circle has too few stitches. The circumference cannot keep up with the radius, forcing the perimeter inward. Solution: Ensure you are completing every increase and check that your hook is not too small.
🌊 Why Rugs Ripple like Potato Chips
If the outer rounds ruffle, wave, or buckle with excess fabric, your circle has too many stitches. The circumference is growing faster than the surface area requires. Solution: Relax your starting tension and follow the standard 8-to-10 stitch increase rule for half double crochet.
For Half Double Crochet (hdc), the magic increase number is consistently 8 to 10 stitches per round. In this pattern, we establish a clean 8-stitch foundation and add exactly 8 increases per round, producing a dense, sturdy mat that sits pancake-flat on hardwood, tile, or laminate flooring.
Choosing the Best Yarn & Cord for Rugs
Unlike wearable garments where drape and lightweight softness are paramount, a rug requires weight, structure, and abrasion resistance. Here are the top three yarn options for this farmhouse rug:
- 5mm Braided Cotton Cord / Macramé Rope (Top Recommendation): Unbeatable stitch definition, zero stretch underfoot, and heavy enough to stay firmly anchored without sliding. You will need approximately 450 to 500 meters.
- Recycled T-Shirt Yarn (Fabric Yarn): Thick, eco-friendly, and very cushioned. Because t-shirt yarn can vary slightly in thickness throughout a bobbin, keep a flexible tension.
- Multi-Stranded Worsted Cotton: If specialty cord is hard to source locally, hold 3 strands of worsted weight cotton (such as Lily Sugar ‘n Cream or Paintbox Cotton Aran) together simultaneously. It creates an enchanting marled vintage effect!
Materials & Tools Checklist
- Yarn/Cord: Approximately 480 yards (440 meters / ~1,200 grams) of 5mm braided cotton rope or super bulky yarn (#6 / #7). Plan your stash with our free Yarn Yardage & Skein Estimator.
- Crochet Hook: Size 9.0 mm (M/N-13) or 10.0 mm (N/P-15). A smooth aluminum or ergonomic resin hook glides effortlessly through cotton cord without snagging. Need metric conversions? See our Hook Size Conversion Guide.
- Stitch Marker: 1 locking stitch marker to track the beginning of each round.
- Jumbo Tapestry Needle: For weaving in chunky cord ends.
- Heavy-Duty Craft Scissors: For clean cord cuts.
- Floor Protection: Clear silicone caulk or non-slip latex rug backing (detailed in the safety section below).
Stitch Abbreviations (US Terminology)
This tutorial is written in standard US crochet terms. Crafters familiar with UK conventions can check our US vs UK Crochet Terms & Glossary (remember that a US Half Double Crochet equals a UK Half Treble Crochet).
- MR: Magic Ring (Adjustable Loop)
- ch: Chain
- st(s): Stitch(es)
- sl st: Slip Stitch
- hdc: Half Double Crochet
- inc: Increase (work 2 hdc into the same stitch)
- blo: Back Loop Only
- rep: Repeat
Step-by-Step Round-by-Round Tutorial
Round 1: The Magic Ring & Solid Center
Begin by forming a Magic Ring with your chunky cord. If you find the magic ring too stiff with 5mm cord, you may alternatively ch 4 and sl st to the first chain to form a tight center ring.
Ch 1 (does not count as a stitch here and throughout). Work 8 hdc into the center of the magic ring. Pull the yarn tail firmly to close the center hole. Sl st into the first hdc of the round to join. (8 sts)
Round 2: The Base Expansion
Ch 1. Work 2 hdc in each stitch around. Sl st into the first hdc to join. (16 sts)
Artisan Tip: Lay your circle flat on the table and gently press it with the palm of your hand. It should look like a miniature solid disc.
Round 3: Single Stitch & Increase
Ch 1. *1 hdc in the first st, 2 hdc in the next st (inc)*. Repeat from * to * around. Sl st into first hdc to join. (24 sts)
Round 4: Staggering the Increases (The Secret to a Perfect Circle!)
When increases are placed directly stacked on top of each other every round, your circle slowly turns into an octagonal polygon with visible corners. To keep your rug perfectly round, we stagger the increases on even-numbered rounds:
Ch 1. Work 1 hdc in the first st, 2 hdc in the next st (inc), *1 hdc in each of the next 2 sts, 2 hdc in next st*. Repeat from * to * until 1 stitch remains. Work 1 hdc in the last st. Sl st to join. (32 sts)
Rounds 5 Through 14: Systematic Expansion
Continue expanding the circle, adding exactly 8 stitches to each subsequent round according to this formula:
- Round 5: Ch 1. *1 hdc in next 3 sts, 2 hdc in next st*. Rep around. Join. (40 sts)
- Round 6: Ch 1. 1 hdc in next 2 sts, inc, *1 hdc in next 4 sts, inc*. Rep until 2 sts remain; 1 hdc in last 2 sts. Join. (48 sts)
- Round 7: Ch 1. *1 hdc in next 5 sts, inc*. Rep around. Join. (56 sts)
- Round 8: Ch 1. 1 hdc in next 3 sts, inc, *1 hdc in next 6 sts, inc*. Rep until 3 sts remain; 1 hdc in last 3 sts. Join. (64 sts)
- Round 9: Ch 1. *1 hdc in next 7 sts, inc*. Rep around. Join. (72 sts)
- Round 10: Ch 1. 1 hdc in next 4 sts, inc, *1 hdc in next 8 sts, inc*. Rep until 4 sts remain; 1 hdc in last 4 sts. Join. (80 sts)
- Round 11: Ch 1. *1 hdc in next 9 sts, inc*. Rep around. Join. (88 sts)
- Round 12: Ch 1. 1 hdc in next 5 sts, inc, *1 hdc in next 10 sts, inc*. Rep until 5 sts remain; 1 hdc in last 5 sts. Join. (96 sts)
- Round 13: Ch 1. *1 hdc in next 11 sts, inc*. Rep around. Join. (104 sts)
- Round 14: Ch 1. 1 hdc in next 6 sts, inc, *1 hdc in next 12 sts, inc*. Rep until 6 sts remain; 1 hdc in last 6 sts. Join. (112 sts) — At this stage, your rug measures approximately 33 inches in diameter.
Round 15: The Structured Farmhouse Border
To give your rug a substantial, non-curling border that defines the edge cleanly:
Ch 1. Work 1 sl st in the Back Loop Only (BLO) of every stitch around. Do not pull these slip stitches tightly — keep them relaxed so the edge does not cup inward. (112 sl sts)
The BLO slip stitches create a beautiful braided cord frame that frames the textured half double crochet center with tailored elegance.
The Seamless Invisible Fasten-Off
Instead of working a traditional knot that leaves an unsightly bump on the border:
- Cut your cord leaving a 10-inch tail. Pull the live loop straight up through the last stitch without yarning over.
- Thread the tail onto your jumbo tapestry needle.
- Insert the needle from back to front under both top loops of the first slip stitch of Round 15.
- Insert the needle straight down through the center of the last slip stitch you created.
- Pull gently to match the tension of the surrounding stitches. You have just created a counterfeit stitch that makes the seam 100% invisible!
- Weave the cord tail securely on the reverse side through at least 6 to 8 dense stitches.
Size Customization & Yardage Guide
Want to adapt this design for different spaces in your home? Use this handy reference table:
| Rug Size | Finished Diameter | Total Rounds | Approx. Yardage (5mm Cord) | Ideal Placement |
|---|---|---|---|---|
| Bedside / Bath Accent | 24 inches (61 cm) | 10 rounds | ~260 yards (240 m) | Bathroom vanity, bedside step, pet mat |
| Farmhouse Classic (This Pattern) | 36 inches (91 cm) | 15 rounds | ~480 yards (440 m) | Entryway, nursery rocker, reading armchair |
| Statement Area Rug | 48 inches (122 cm) | 20 rounds | ~780 yards (715 m) | Living room center, coffee table anchor |
Crucial Safety Tip: Adding Invisible Non-Slip Backing
A handmade crochet rug on a smooth hardwood, marble, or tile floor can slide easily underfoot. Making your rug non-slip is an essential step before putting it into daily use:
- Method 1: 100% Silicone Lines (Quick & Inexpensive): Flip your finished rug onto its reverse side. Using a standard tube of clear 100% silicone caulk, apply thin concentric rings or a crisscross grid directly onto the back stitches. Smooth lightly with a gloved finger and allow to cure for 24 hours. Once dry, the silicone provides an invisible, permanent rubberized grip that survives washing!
- Method 2: Natural Liquid Latex: Paint a thin coat of liquid latex over the back with a foam brush. It creates a flexible, factory-grade non-slip backing.
- Method 3: Felt Rug Gripper Pad: Cut an inexpensive rubber mesh rug pad 1 inch smaller than your crochet rug and place it underneath.
Washing & Maintenance Instructions
Because braided cotton rope is resilient and tough, caring for your farmhouse rug is straightforward:
- Regular Care: Shake outside weekly to remove dust. You can vacuum using the suction hose attachment (avoid high-power rotating beater bars that might catch on stitches).
- Machine Washing: For 24″ to 36″ rugs, machine wash in a front-loading washer on a gentle cold-water cycle using mild detergent.
- Drying & Blocking: Lay flat on clean dry towels to air dry. While damp, gently reshape the circle with your hands, smoothing the outer edges flat. Do not hang on a clothesline while wet, as the heavy water weight will distort the circular shape.
Frequently Asked Questions (FAQ)
Can I make this rug with standard yarn from my stash?
Yes! If you do not have chunky cotton cord, you can hold 3 or 4 strands of regular worsted weight (#4) cotton yarn together at the same time. This is a wonderful way to use up cotton stash yarn and produce a charming marled heather texture.
My rug is starting to ripple slightly around Round 8. What should I do?
Minor ripples often occur if your tension loosens midway. Simply work one round with no increases (1 hdc in each stitch around). This pulls the perimeter back into balance. After that neutral round, resume your regular increase schedule.
Can I sell rugs made from this pattern?
Yes, absolutely! We love supporting independent crafters and artisanal businesses. You are welcome to sell finished rugs made with this tutorial at craft fairs, farmers’ markets, and online boutiques. We kindly ask that you credit Crochet and Love (crochetandlove.com) as the design source.
A Note from Elena Croft
“There is something profoundly satisfying about stepping onto a rug you created with your own two hands. Don’t be afraid to experiment with earthy duo-tone stripes or subtle contrasting borders to match your home’s color palette. If you make this rug, I would love to see it — share your finished photos with us at [email protected]!”