
Modern Farmhouse Crochet Potholder: Free Double-Thick Thermal Stitch Pattern
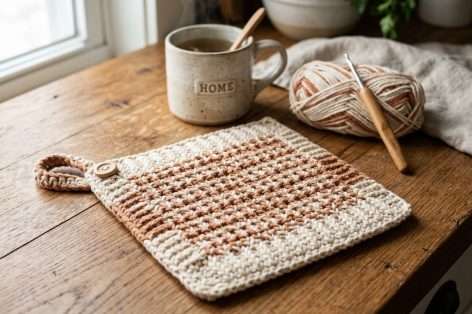
If you have ever pulled a scorching cast iron skillet from the oven using a regular crocheted potholder, you likely discovered an unfortunate truth: standard crochet stitches have tiny gaps that allow intense heat to burn your fingers. Traditional single or double crochet hot pads simply aren’t thick enough on their own — unless you crochet two separate squares and awkwardly stitch them together.
Enter the Double-Thick Farmhouse Crochet Potholder, crafted with the genius Thermal Single Crochet Stitch. This specialized technique creates an ultra-dense, spongy, double-layered fabric in a single continuous piece — zero seams, zero lining, and zero gaps. It yields a boutique-grade, heat-resistant hot pad that protects your countertops and hands while adding effortless rustic charm to your kitchen.
📌 Quick Pattern Overview
- Skill Level: Advanced Beginner (Easy repetition once the stitch placement is learned)
- Terminology: US Crochet Terms (Adhering to Craft Yarn Council standards)
- Finished Dimensions: Approximately 7.5 inches × 7.5 inches (19 cm × 19 cm)
- Fabric Density: Extra thick, heat-resistant, reversible double-layered cushion
- Time to Make: Approximately 2 hours from cast-on to final weave-in
- Care: 100% Machine washable and dryable
Why Yarn Selection Is Crucial for Kitchen Crochet
Before you pick up your hook, there is one non-negotiable rule every fiber artist must follow for kitchen accessories:
Acrylic, polyester, nylon, and other synthetic fibers are petroleum-based plastics. When exposed to hot pans, boiling pots, or baking trays (above 300°F / 150°C), acrylic will literally melt into your skin and cause severe burns. For any heat-bearing project, strictly choose 100% natural, non-mercerized cotton yarn.
Our Favorite 100% Cotton Yarns for This Project
- Lily Sugar ‘n Cream: The undisputed classic. Inexpensive, readily available, sturdy, and softens beautifully with every wash.
- Paintbox Yarns Cotton Aran: Ultra-soft texture, excellent stitch definition, and an enormous palette of modern earth tones.
- Lion Brand 24/7 Cotton: A mercerized chainette cotton that offers a lustrous sheen, zero splitting, and exceptional durability over years of kitchen use.
- Dishie by KnitPicks: Tight ply, absorbent, and wonderfully gentle on the hands during extended crocheting sessions.
The Magic Behind the Thermal Stitch
Standard single crochet passes through both top loops (or back loop only) of the current working row. The Thermal Single Crochet (t-sc) works differently: on every row, you insert your hook through the Back Loop Only of the current row AND simultaneously through the unworked front loop from the row directly below.
By connecting two rows with every single stitch, the fabric naturally folds over itself into an interlocking accordion weave. The result is a lush, springy pad that is exactly twice as thick as normal crochet without needing any synthetic batting or complicated multi-layer sewing.
Materials & Tools Checklist
- Yarn: 100% Worsted Weight Cotton Yarn (Medium #4) — Approximately 120 yards (110 meters / ~70 grams). Need yarn estimates? Check our free Yarn Yardage & Skein Estimator.
- Crochet Hook: Size H/8 (5.0 mm) or I/9 (5.5 mm). Tip: Thermal stitch produces very dense tension, so sizing up by 0.5 mm prevents your hand from tiring and keeps the fabric pleasantly flexible. Need size conversions? See our Hook Size Conversion Guide.
- Tapestry Needle: Blunt-tip yarn needle for cleanly weaving in ends.
- Sharp Craft Scissors: For crisp yarn cuts.
- Optional Embellishment: A 1-inch natural wooden ring or genuine leather hanging strap with a brass rivet for a boutique farmhouse look.
Stitch Abbreviations (US Terminology)
This tutorial uses standard US crochet abbreviations. If you are accustomed to British or Australian conventions, refer to our comprehensive US vs UK Crochet Terms & Glossary.
- ch: Chain
- st(s): Stitch(es)
- sc: Single Crochet
- blo: Back Loop Only
- t-sc: Thermal Single Crochet (insert hook in BLO of current row, then through unworked loop of row below; yarn over and pull up a loop, yarn over and pull through both loops on hook)
- sl st: Slip Stitch
- yo: Yarn Over
Step-by-Step Pattern Instructions
Step 1: Foundation Chain & Base Row
Foundation: Leaving a 6-inch tail for weaving, ch 26 (or any number of chains depending on your desired width).
Row 1 (Setup): Insert hook into the back bump of the second ch from the hook. Work 1 sc in each back bump across to the end. Turn. (25 sc)
Artisan Tip: Working into the back bump of the foundation chain creates a clean, braided edge that matches the final finishing row perfectly.
Step 2: Establishing the Thermal Stitch
Row 2: Ch 1 (does not count as a stitch here and throughout). Tilt your work slightly forward so you can see the unworked foundation loops from Row 1. Insert hook under the back loop of the first st, then down into the parallel unworked loop from Row 1. Yo, pull up a loop (2 loops on hook), yo, pull through both loops. Repeat across all 25 stitches. Turn. (25 t-sc)
Step 3: Building the Dense Double-Thick Body
Row 3: Ch 1. Insert your hook into the back loop only of the first stitch, and through the unworked front loop from the row directly below. Yo, pull up a loop, yo and pull through 2 loops on hook. Repeat across all 25 stitches. Pay special attention to the very last stitch of each row to maintain perfectly straight side margins. Turn. (25 t-sc)
Rows 4 – 32 (or until square): Repeat Row 3. Because the thermal stitch compresses vertically, a standard square requires approximately 30 to 34 rows. Continue until your work measures equal in width and height (approximately 7.25 inches).
Step 4: The Clean Finishing Row
If you fasten off after a regular thermal row, the top edge will leave open loops. To seal both layers together with a tailored finish:
Final Row (Closing): Ch 1. Insert your hook under BOTH top loops of the current stitch AND the unworked loop from the row below (catching 3 loops total on your hook). Yo, pull through all three loops and complete a regular sc. Repeat across all 25 stitches. Your top border is now completely closed, firm, and identical to the bottom edge!
Step 5: Seamless Corner Hanging Loop
Do not fasten off yet! To create a functional corner hanging loop without sewing extra pieces:
- At the end of your final closing row, ch 12 (or ch 16 if hanging on thick wooden shaker pegs).
- Form a loop by working a slip stitch directly into the base of the corner stitch.
- Work 14 single crochet stitches directly around the chain loop space to give it substantial body and prevent stretching under weight.
- Sl st into the corner edge to secure. Fasten off leaving an 8-inch yarn tail.
How to Customize the Size
The beauty of this pattern is its flexible scalability. The thermal stitch has no strict multiples — simply chain your target width plus one chain for turning:
| Project Size | Starting Chain | Total Rows | Estimated Yardage | Best Used For |
|---|---|---|---|---|
| Mini Mug Rug / Coaster | 16 ch | ~18 rows | ~45 yds | Hot coffee mugs, teapot rests, candles |
| Standard Potholder | 26 ch | ~32 rows | ~120 yds | Everyday oven mitt replacement, skillet handle grabber |
| Casserole Trivet / Hot Pad | 36 ch | ~44 rows | ~210 yds | Large Dutch ovens, 9×13 baking dishes, dining table protection |
Finishing & Professional Blocking
Because the thermal stitch holds tight tension, the corners can occasionally cup inward. Giving your finished potholder a 10-minute wet block elevates it to artisan craft-fair standard:
- Weave in your yarn tails with a tapestry needle, splitting the fibers internally so ends never pop out in the wash.
- Submerge the potholder in lukewarm water for 10 minutes until thoroughly saturated.
- Gently press out excess moisture between clean towels (never wring or twist cotton fibers).
- Pin the piece onto foam blocking tiles, ensuring all four corners form crisp 90-degree right angles. Allow to air-dry completely.
Washing & Daily Kitchen Care
Unlike delicate lace or wool garments, 100% cotton thermal potholders are workhorses built for daily kitchen duty:
- Machine Wash: Wash with regular laundry in warm or hot water with mild detergent.
- Stain Removal: For tomato sauce or oil stains, rub a paste of baking soda and liquid dish soap directly onto the spot before laundering.
- Drying: Tumble dry on medium heat. Cotton will tighten slightly on the first dry cycle, making the thermal stitch even denser and more heat-protective!
Frequently Asked Questions (FAQ)
Is this crochet potholder truly heat resistant for cast iron?
Yes! The double-thick thermal weave eliminates all gaps and provides two full interlocking layers of pure cotton fiber. It safely handles cast iron skillets, oven racks, and cookie sheets up to 450°F (230°C). For extremely high-heat commercial applications (above 500°F), we recommend folding it in half or using a silicone underlayer.
Why are the edges of my potholder curling or slanted?
Curling usually happens when your initial chain is worked too tightly, or if you accidentally miss the very last stitch of a row. Always count your stitches every few rows (you should consistently have 25 stitches across). If your starting chain is tight, try making your foundation chain with a hook 1.0 mm larger than your working hook.
Can I sell physical potholders made from this pattern?
Absolutely! We encourage makers and small business owners to sell finished handmade items created from our tutorials at local craft fairs, farmers’ markets, and online shops. We simply ask that you credit Crochet and Love (crochetandlove.com) as the pattern designer.
A Note from Elena Croft
“There is nothing more comforting than a kitchen filled with handmade touches that are both beautiful and fiercely functional. The thermal potholder is my go-to housewarming and holiday gift — pair two potholders with a wooden spoon and a jar of homemade jam for an unforgettable gift set. Happy stitching!”