Reading Crochet Diagrams: A Guide to newbies
Embarking on your crochet journey can be both exciting and overwhelming, especially when faced with the intricate diagrams that guide the creation of beautiful stitches and patterns. In this guide tailored for newcomers, we unravel the mystery behind crochet diagrams, demystifying their symbols and structure to empower you to tackle any project with confidence
If you’re new to crochet, you may find crochet diagrams a bit intimidating. However, with a little practice and patience, you can learn how to read them quickly and easily.
If you’re just starting out with crochet, reading diagrams may seem daunting. However, it’s not as hard as it looks! With a bit of practice and patience, you’ll soon be able to understand them with ease.
Crochet diagrams are an important tool used by crocheters to create intricate patterns. They are composed of symbols, with each symbol representing a single stitch or a group of stitches. Instructions for the individual stitches are provided with the diagram, which is typically viewed from the right side.
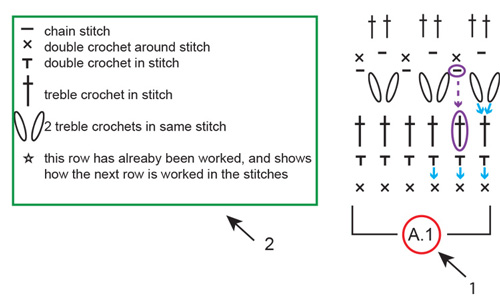
A sample diagram is shown
Crochet Diagram
1: A diagram labeled A.1 has been created with all of its contents lying within the square brackets. This diagram is a single repetition of all the elements present inside the brackets.
2: Symbols are given meaning in this explanation of how they are used. This definition outlines the purpose of each symbol and the impact it has on the overall context.
The blue arrows signify a stitch that is worked in or around the one directly beneath it. Multiple stitches may also be incorporated into the same spot. In contrast, the purple ovals and arrows indicate that a chain stitch should be made without working into the stitch below.
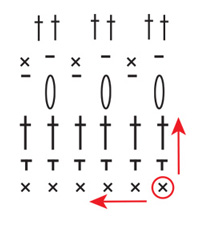
Crochet diagrams are read in an unusual way, beginning with the symbol in the bottom right corner and progressing leftward and upward. This is demonstrated in the diagram below, with the starting point highlighted in red.
Workers should repeat diagrams multiple times in a row or round. Once they reach the end of the row, they should start the diagram again from the first symbol.
crochet Graphics
Back and forth:
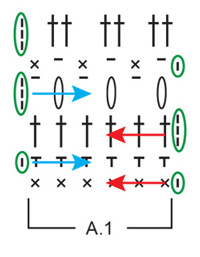
Crochet enthusiasts are sure to know that the process of working back and forth requires alternating rows from the right side and wrong side. The diagram must be read in the opposite direction when crocheting from the wrong side, moving from left to right as indicated by the red arrow from the right side and the blue arrow from the wrong side.
Crocheters should be aware that the number of chain stitches they work at the beginning of each row determines the height of the following stitch. If the pattern includes a diagram, the number of chain stitches should be counted as they appear.
If not, the CROCHET INFORMATION at the top of the instructions will inform the crocheter how many chain stitches to work and whether these stitches are replacing or in addition to the first stitch of the row.
Graphic 3
In the round:
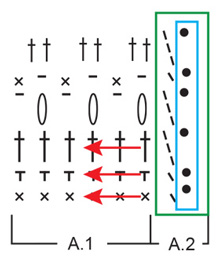
You have the opportunity to work from the right side when crocheting in the round. This method requires that all rounds are worked from right to left, as indicated by the red arrows in the diagram. Furthermore, the start and end of each round is usually featured in its own diagram (see A.2 below – green square).
Crocheters know that when working in rounds, you must begin with a given number of chain stitches. This number is equal to the height of the following stitch. To complete the round, the starting and ending points are connected with a slip stitch in the last of the chain stitches. This is demonstrated in the blue square below.
You should take note: the chain stitches in A.2 mark the start of the round, while the slip stitch signals the end.
If you’re looking to complete a pattern that calls for multiple repetitions of diagram A.1, remember that you should finish the last stitch before starting again at the first stitch on the same row. Additionally, diagram A.2 outlines how to begin and end the entire round.
Graphic 4
Successive diagrams were used in a row/round to achieve a desired result
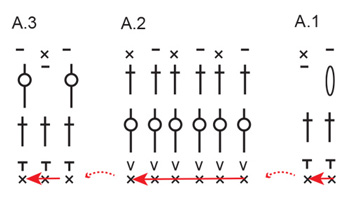
Work 1st row in diagram 1. For the next row, move on to diagram 2 and work 1st row, then proceed to diagram 3 and work the 1st row, and so on. When working back and forth, the diagrams should be worked in the reverse order, beginning with diagram 3, then diagram 2 and finally diagram 1. Also, the directions should be worked in the opposite way as normal.
graphic 5
Circular diagrams
When working in a circular pattern, it is often shown in a circular diagram. This diagram can either display the full circle, where each symbol is worked out as it appears, or it can display a fraction of the circle that is then repeated to make a complete one.
Full circle
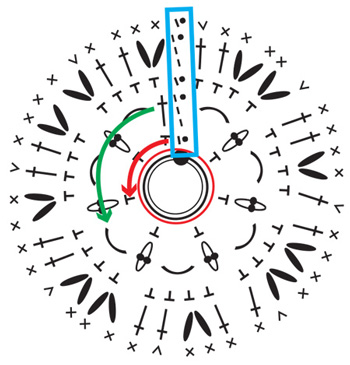
To begin a full circle diagram, start with the symbol in the center, usually a small circle that stands for a predetermined number of chain stitches.
This is created with a slip stitch (as seen in the red circle). Just like working in the round, the round begins with the same number of chain stitches as the height of the next symbol and ends with a slip stitch in the last chain stitch (seen in the blue square).
Note that in the diagram, the chain stitches are not a replacement for any symbols and all symbols must be worked as they appear. If the chain stitches do replace any stitch, the stitch will be taken out of the diagram.
Begin by working counter-clockwise, from right to left, one symbol at a time (see red arrow). The stitches in the first round should be worked AROUND the chain stitch ring, meaning the crochet hook should be inserted THROUGH the middle of the chain stitch ring and the yarn strand should be pulled back through the ring and the stitch should be worked as normal.
Don’t work the stitch IN any of the chain stitches, but rather AROUND the chain stitch ring. At the end of the round, join the beginning and end with a slip stitch, then start the second round, which is the second closest to the middle (see green arrow).
graphic 6 – Circular
Fraction of a circle
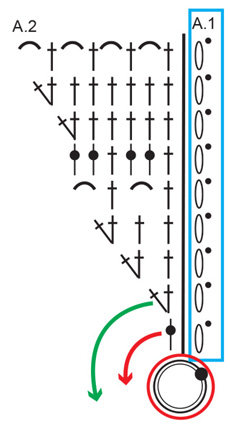
The diagram shown is only a fraction of a circle because the given fraction is repeated to make a full circle.
Starting at the bottom (red circle) and working round, you will need to follow the same steps as if you were working a full circle. However, you must also refer to the separate diagram (blue square) to illustrate the beginning and end of the round.
Begin with the diagram row closest to the chain stitch ring at the bottom, then work the chain stitch(es) in A.1. After that, work the symbol(s) in A.2 (in the first round there is only 1 symbol) and repeat the symbol(s) in A.2 the number of times stated in the pattern.
Once the first round is finished, join the next round by slip stitching into A.1. Then, continue with the second round, which should be the next closest to the chain stitch ring (refer to the green arrow below).
graphic 7
Square diagrams / colour diagrams
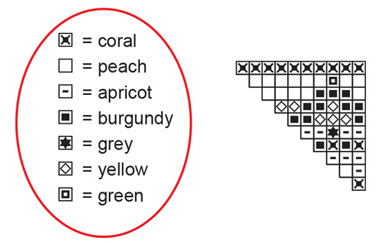
Crochet diagrams are often shown in a square grid format, with one square equalling one stitch. The instructions for the pattern will usually explain what type of stitch to use, and the diagram is used to show what colours the stitches should be worked in (see the red circle below for symbol definition).
Depending on the type of work you are doing, you may need to work in one of three ways: back and forth, in the round, or in a circular diagram.
graphic 8
I hope you have learned about Crochet Diagrams! Navigate at our website and learn other things now!
Crochet Yarn – Soft, Smooth, or Sparkly?
When it comes to crochet, choosing the right yarn isn’t just about color or pattern — it’s also about how it feels . After all, you’ll be working with it for hours, and the person who ends up wearing or using your finished project will notice the texture too.

The Difference Between Knitting Yarn and Crochet Yarn
When you’re just starting out in the world of fiber crafts, it’s easy to wonder: is there really a difference between knitting yarn and crochet yarn ? The short answer is no — not really.
How to Choose the Perfect Yarn for Your Crochet Project
Are you standing in front of your yarn stash (or scrolling through an online shop) wondering which yarn to pick? Choosing the right yarn can make or break your crochet project — not just in how it looks, but in how much you enjoy making it!
